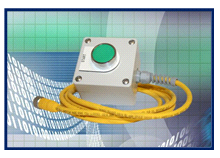
Start Button
The I-Mark Start Button (sold separately by Columbia Marking Tools) allows a marking program to be executed repeatedly without interacting with the I-Mark software. This feature is ideal for production environments where a PC is not available during marking or when mouse and keyboard operation is not desired.
When pressed, the start button triggers the marking layout assigned to Slot 0 in the controller.

Hardware Setup
- Plug the 25-pin connector into the back of the I-Mark Controller.
- Ensure the connector is properly seated in the Input and Output ports as labeled on the controller.

Assigning a Layout to the Start Button

- Open the I-Mark software.
- Navigate to the Controller ribbon and select Layouts.
- This opens the Layout Configuration dialog.
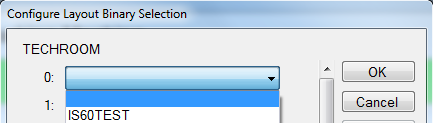
- Use the drop-down menu to assign the desired marking layout to Slot 0.
- When the controller receives a start signal from the external push button, it will execute the program assigned to Slot 0.

Activating the Configuration
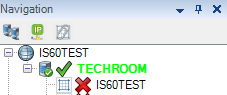
- After assigning the desired layout to Slot 0, navigate to the Controller Page.
- Click Download to save the layout and start button configuration to the controller.
- Once downloaded, pressing the start button will execute the assigned program.
After you input the layout into the field you will receive a Red X on the layout in the navigation window. (Note when you receive the Red X just do a download as its letting you know you made a change to the layout). It’s always best to do a download to eliminate the delay time in the marking caused from streaming from PC.
When I-Mark receives the start input from the external push button, it will execute whichever program has been assigned to binary selection 0 and allows you to continue to mark without having to open the software to press the start button in the I-Mark software

Best Practices
- Always verify the correct marking layout is assigned to Slot 0 before operation.
- Ensure all 25-pin connections are firmly seated in the correct input/output ports.
- Test the start button in a safe environment prior to full production use to confirm proper operation.
THINGS IN THIS SECTION ARE SUBJECT TO CHANGE IF YOUR FACTORY HAS DIFFERENT POLICIES FOR START BUTTONS SUCH AS HAVING AN ABORT BUTTON.
Created with the Personal Edition of HelpNDoc: Modernize your help files with HelpNDoc's WinHelp HLP to CHM conversion tool