Inserting Entities
After creating a new layout, the software will automatically open the layout window and display the layout ribbon.
The layout must contain the data that will be marked. Each individual piece of marking data is referred to as an entity.
Available Entity Types
To add content to the layout, select the appropriate entity type from the ribbon. The following entity types are available:
- Graphic
- Line
- Text
- Data Matrix
- UID Code
Each inserted entity will appear in the layout window and represent the exact content to be marked on the material.
Adding Text
Text entities allow you to insert alphanumeric content into the marking layout.
Procedure
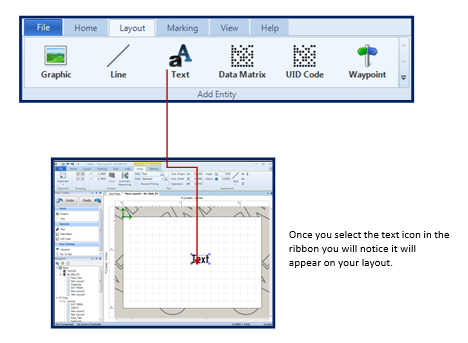
- Select the Text icon from the ribbon.
A text entity will appear in the layout window.
- Double-click the text entity to open the text editor.
- Enter the desired text in the editor.
- Select Accept.
The text editor will close, and the entered text will appear in the layout workspace

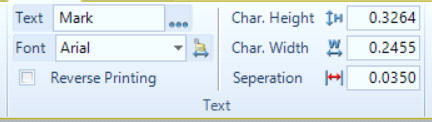
Reverse Printing for Multiple Lines
When marking multiple lines of text, enable the Reverse Printing option for alternating lines.
Reverse Printing causes the machine to begin marking at the end of the selected entity and move toward the beginning.
To optimize marking machine efficiency:
- Enable Reverse Printing on every other line of text.
- Alternate this setting for each consecutive line.
Proper use of this feature improves readability and reduces unnecessary axis travel.
NOTE: REVERSE PRINTING ON SOME MACHINES CAUSE A SMALL DOT TO APPEAR BETWEEN WORDS.
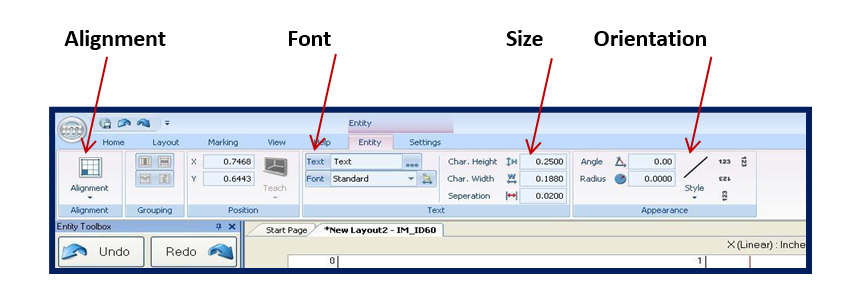
Once a text entity has been inserted into the layout, its properties can be modified.
When a text entity is selected in the layout window, the ribbon automatically updates to display the properties specific to that entity.
Editable Properties
The following text properties may be adjusted:
- Size
- Angle
- Orientation
- Font Type
Adjustments made in the ribbon are reflected immediately in the layout window.


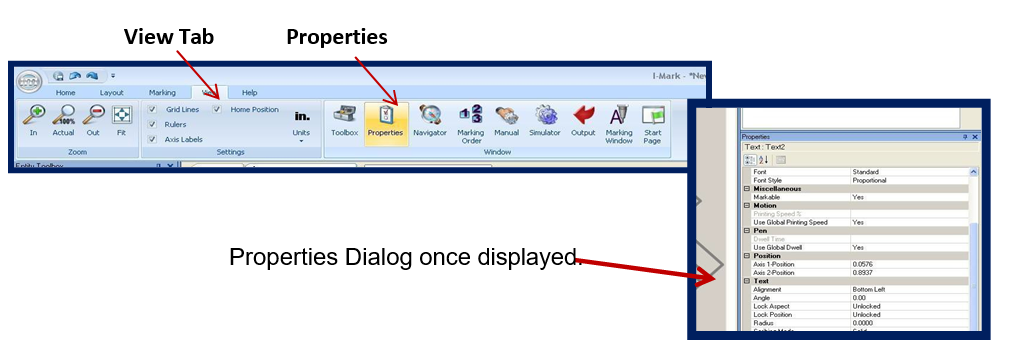
Accessing the Properties Panel
Text properties may also be accessed through the Properties panel.
To open the Properties panel:
- Select the text entity in the layout.
- Select the Help tab.
- Click Properties.
A properties window will appear in the lower-right corner of the application workspace.
Scroll within this panel to view all available entity parameters. Double-click a property field to modify its value.
Columbia Marking Tools recommends adjusting text properties through the ribbon interface unless advanced configuration is required.

Editing Text Content
To edit the content of a text entity:
- Double-click the text entity in the layout.
- The Text Editor dialog window will open.
- Modify the text as required.
- Select Accept to apply changes.
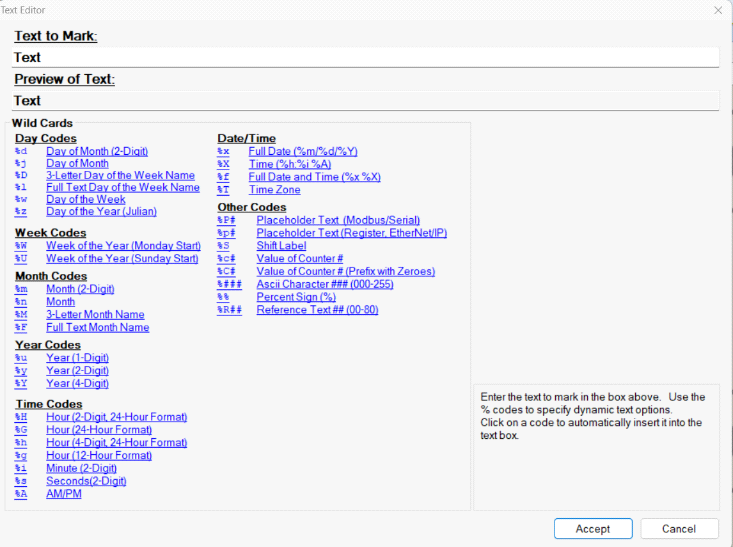
Input field Preview Field Hyperlinks

Fixed and Dynamic Text
The Text Editor supports both fixed and dynamic text.
- Fixed Text – Static content that does not change (e.g., part name, model number).
- Dynamic Text – Automatically updating content (e.g., counter, date, time).
A single text string may contain:
- Fixed text
- Dynamic text
- A combination of fixed and dynamic elements
Dynamic elements update according to system configuration at the time of marking.

Interface Flexibility
Most functions within the I-Mark software can be accessed in multiple ways, including:
- Ribbon icons
- Side panels
- Right-click shortcut menus
Regardless of the method used, changes apply directly to the selected entity.
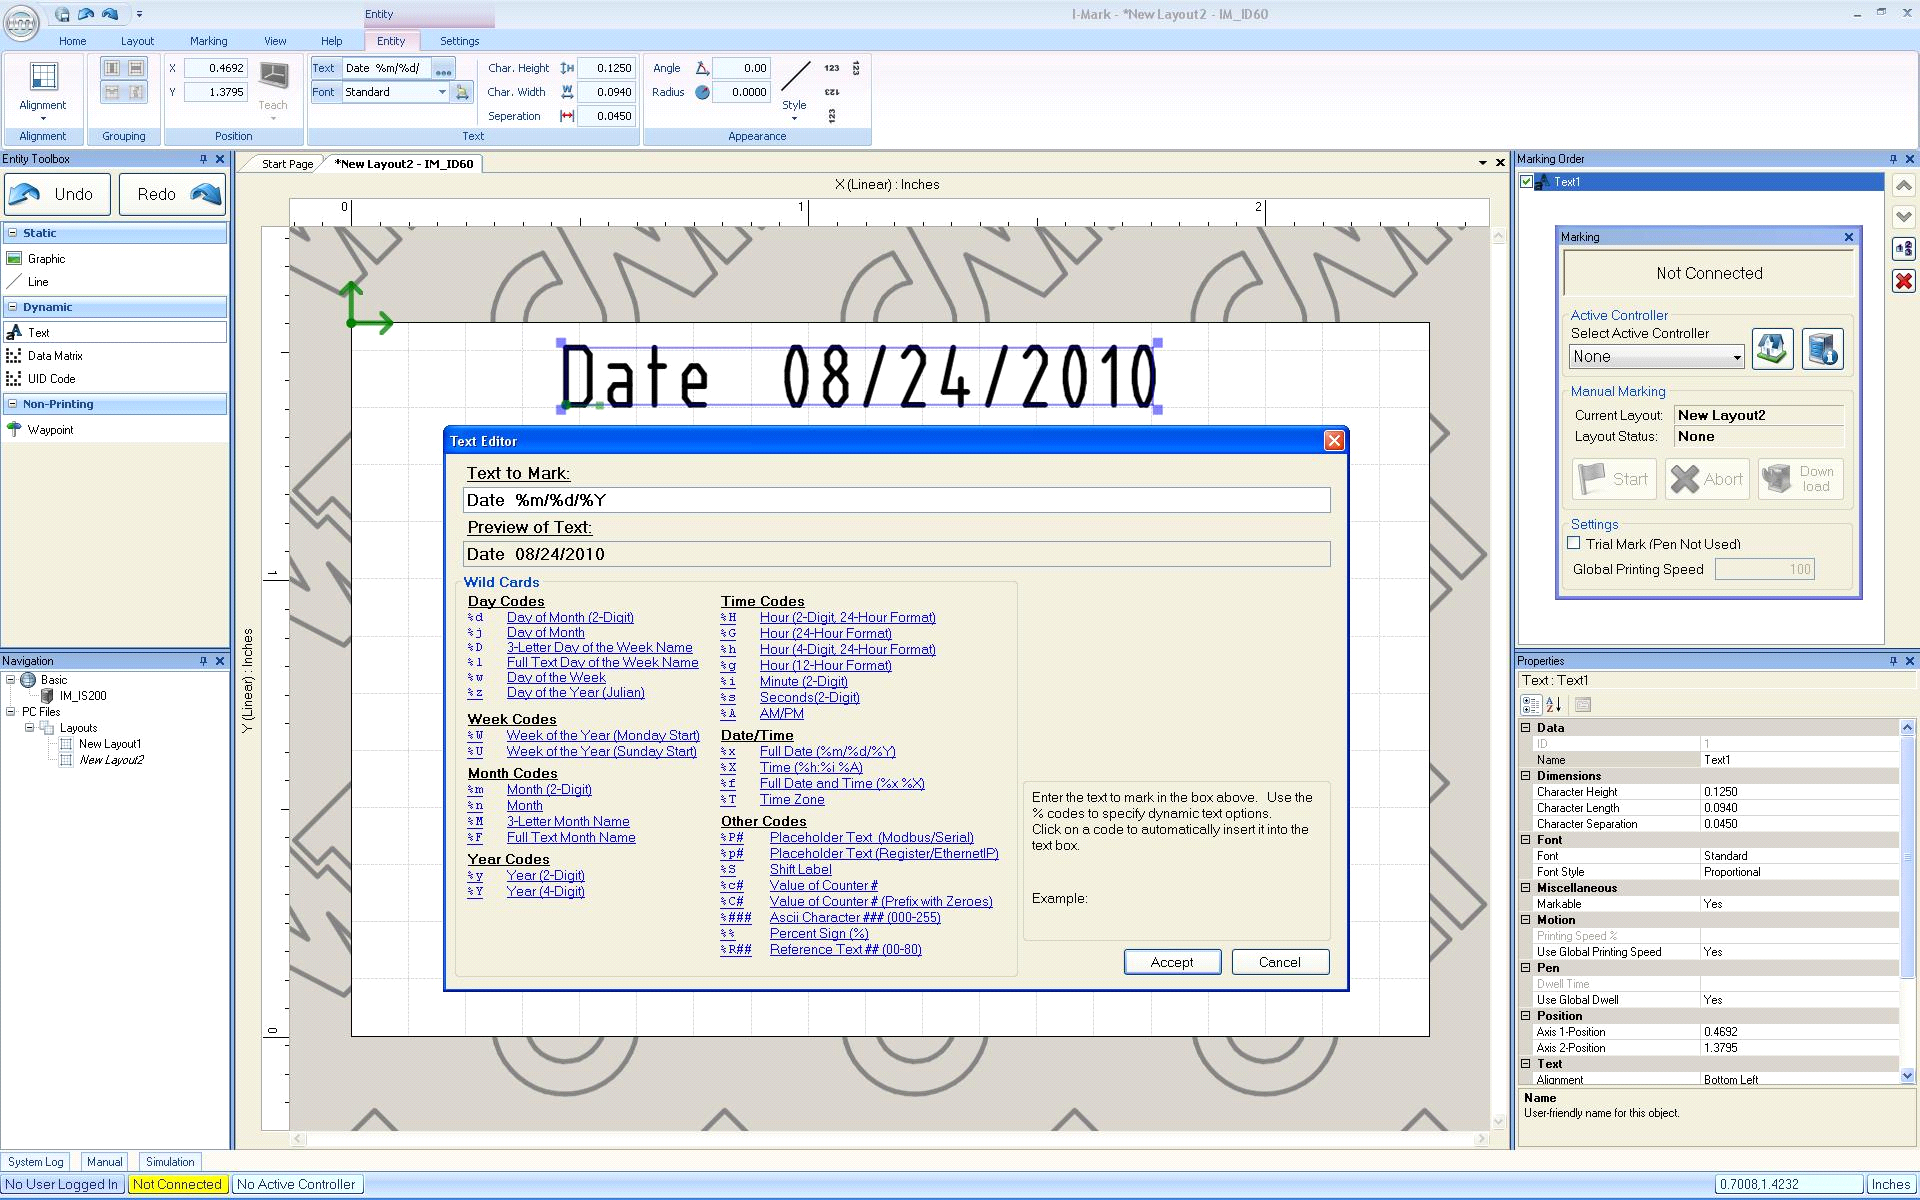
Wild Cards
A Wild Card is CMT’s term for dynamic text—text elements that automatically change based on system data.
The following example demonstrates how a Wild Card can be used within a text string that combines fixed text with dynamic (Wild Card) elements.
You will notice that once you enter text into the input field it will also appear in the preview window – a helpful feature to further your understanding and comprehension of the text you are placing.
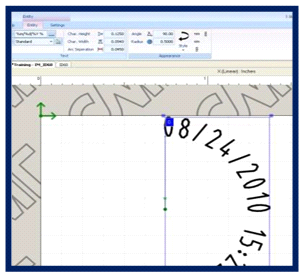
Creating a Dynamic Date String
To create a text string that displays the current system date (mm/dd/yyyy), follow these steps:
Procedure
- In the Layout Ribbon tab, select the Text icon to insert a text entity into your layout.
- Double-click the text entity to open the Text Editor window.
- Type any fixed text in the editor. Example:
Date - Insert Wild Cards using the list of options in the Text Editor window, or type the corresponding code directly at the top of the editor:
- Month (2-Digit): %m
- Day of Month (2-Digit): %d
- Year (4-Digit): %Y
- Add forward slashes / as needed to format the date:
Example sequence: Date %m/%d/%Y - Click Accept to save the text string.
The text entity will now display in the layout according to the settings of the layout (position, font, size, orientation). The preview window reflects the final appearance.
Important: Wild Card codes are case-sensitive. Ensure correct case to generate the proper value.
Make sure to click “Accept” before exiting.
Quick tip! If you want to quickly edit your already written text click on the entity, to open the entity ribbon, there you will find a section called text, and right above the font selector, you can click on your text to quickly edit – without opening the larger window dialog box.
Congratulations you have just written a dynamic text, now we can edit our text
Character Size
Methods of Adjustment
1. Manual Resizing
- Select the text entity in the layout.
- Use the corner arrows to drag the text to the desired size.
This method behaves similarly to resizing text in other standard software programs.
2. Numeric Entry
- In the Entity Ribbon, navigate to the Text section.
- Enter the desired character height in inches.
Note: When adjusting character height numerically, the character width automatically updates to maintain the original aspect ratio of the text. This also occurs when resizing manually using the corner arrows.

Separation Control
Separation adjusts the spacing between individual characters in a text entity.
- Enter the desired separation value in the Entity Ribbon.
- Separation ensures precise control over text appearance in your mark.
Important: Unlike character size, separation cannot be adjusted manually by dragging; it must be set numerically in the ribbon.
Angular Text
Creating Angular Text
Angular text allows you to rotate or slant a text entity within the layout to a specified angle.
Procedure
- Select the text entity in the layout.
- The Entity Ribbon will update to display properties for the selected entity on the Entity Tab.
- In the angle dialog box, enter the desired rotation or slant angle.
- Press Enter or click outside the box to apply the change.
The text entity in the layout will update immediately to reflect the new angle.
Radius Text
Radial text allows a text entity to follow a circular path for marking in a curved pattern.
Procedure
- Select the text entity in the layout.
- The Entity Ribbon will update to display properties for the selected entity.
- Locate the Radius property.
- Enter the desired radius value.
- Press Enter or click outside the field to apply the change.
QUICK TIP: FOR PER APPLIED RADIUS OF 0.5000 CLICK STYLE THEN SELECT CLOCKWISE OR COUNTER-CLOCKWISE DEPENDING ON WHERE YOU WANT YOU TEXT TO FOCUS.
The text entity will update immediately in the layout to reflect the specified radius.

Graphic
I-Mark software allows graphics or logos to be added to a marking layout.
Graphics provide additional identification capability and expanded marking flexibility.

Inserting a Graphic Entity
- Select the Layout Ribbon tab.
- Click Graphic.
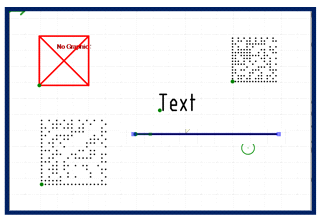
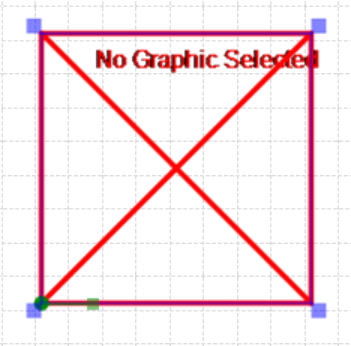
A graphic placeholder will appear in the layout window. The placeholder is displayed as a red box with a cross and the text:
“No Graphic Selection”
This indicates that a graphic has not yet been assigned to the entity.
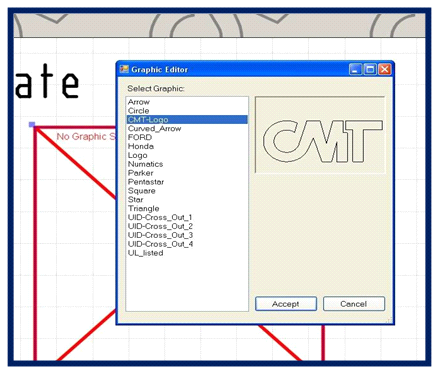
- Double click on the graphic placeholder in the layout.
A list will appear showing:
- System preloaded graphics
- Previously imported graphics
Select the desired graphic from the list.

Importing a DXF Graphic
Graphics must be in DXF format before importing.

Ensure your DXF file is prepared prior to beginning the import process.
Procedure
- Select the File tab above the ribbon.
- Select Import.
- From the submenu, select Import DXF Graphic.
- Browse to and select the desired DXF file.
QUICK TROUBLESHOOT: Please use a simple graphic as complex graphics can cause system errors.

Saving and Naming the Graphic
After selecting the DXF file:
- Save the graphic to the system library.
- Use the dialog box at the bottom of the window to rename the graphic, if desired.
Renaming graphics is recommended for easier identification during future use.

Arc Tolerance Setting
During the import process, you will see an Arc Tolerance setting.
The default value is 100.
Arc Tolerance determines how many line segments are used to approximate an arc.
- Lower tolerance value = more segments (greater detail, smoother arc)
- Higher tolerance value = fewer segments (simpler arc structure)
Value range: 1 to 2000
General guidance:
- Use higher values for simple graphics.
- Use lower values for complex graphics requiring higher arc precision.
Improper tolerance selection may affect graphic smoothness and marking performance.
Created with the Personal Edition of HelpNDoc: Effortlessly optimize your documentation website for search engines